Nothing is better than the perfect summer peach. It makes you want to live in that movment forever. Unfortunately, time marches on and peaches only last for a few weeks before fading faster than summer. In my quest to keep the sun shining as long as possible in Seattle, I have taken to canning peaches. Here are a few recipes that I have tried.
Peaches taken from the book Blue Ribbon Preserves
makes about 4 pint jars
5-6 pounds unblemished, firm, ripe peaches (preferrably freestone)
4 cups water
1 1/2 cups sugar
8 cups cold water
2 Tablespoons antioxidant crystals or ascorbic acid crystals
In a 4-quart pan, combine the 4 cups water and sugar. Over medium-low heat, stirring constantly, heat until the sugar is completely dissolved. Increase the heat to medium-high and bring the mixture to a boil. Boil for 5 minutes. Reduce the heat to low, cover and keep the syrup hot until needed.
In a large bowl, combine the 8 cups cold water and the antioxidant crystals. Stir until the crystals are completely dissolved.
To peel the peaches: Fill an 8-quart pan about half full of water. Over medium-high heat, bring the water to a simmer. Using a mesh basket or slotted spoon, carefully lower the peaches a few at a time, into the water for 1 minute. Remove the peaches from the pan and immediately plunge into a large bowl of ice water for 1-2 minutes. Transfer the fruit to a strainer. Drain well and cool. Repeat with the remaining peaches.
Using a sharp paring knife, carefully slip the skins from the peaches. Cut each peach in half and remove the pit. Using a thin-bowled tableware spoon or a pitting spoon, carefully remove the red fibers from the center of the peaches. Drop the fruit into the antioxidant solution to prevent browning. Do not allow the fruit to remain in the solution for longer than 20 minutes. Remove the peach halves from the solution and rinse under cool water. Drain well.
Now, here is where I veer from the recipe. The recipe wants you to cook the peaches in the simple syrup you made in step one for 3-4 minutes. I did that last year and found my peaches to be to mushy so this year I skipped the step and instead packed the peaches in the jar and then poured the simple syrup over the peaches.
Process the jars in a water bath canner for 25 minutes.
The next recipe is a variation on the first only with vanilla beans
Peaches in Vanilla Syrup recipe from the book Canning for a New Generation
makes about 10 pint jars
1 teaspoon ascorbic acid or 1 tablespoon fresh lemon juice or vinegar
8 lbs peaches
4 cups sugar
2 vanilla beans, split, each piece cut in half
Wash and skin the peaches according to directions above and then put them in a bowl of cold water with the ascorbic acid mixed in.
Prepare a simple syrup with 4 cups sugar and 8 cups water according to the directions in the above recipe.
Pack the peaches in the jars, place one piece of vanilla bean in each jar and fill with the simple syrup. Process in a water bath canner for 25 minutes.
Monday, August 29, 2011
Honeyed Bread and Butter Pickles

Honeyed Bread-and-Butter Pickles
makes 7 pint jars
3 pounds pickling cucumbers (3-4 inches long)
1 pound small onions (about 2)
1/4 cup plus 1 Tablespoon pure kosher salt
2 Tablespoons yellow mustard seeds
1 Tablespoon celery seeds
2 teaspoons crushed red pepper flakes
6 cups cider vinegar (5% acidity)
3/4 cup mild honey
1 1/2 teaspoons tumeric
1 1/2 teaspoons dry mustard powder
Cut off the blossom end of each cucumber; cut into 1/4 inch rounds. Cut the onions in half lengthwise and thinly slice them into half-circles. Put the cucumbers and onions in a large bowl and sprinkle with 1/4 cup salt, tossing to combine. Cover with a layer of ice cubes and refrigerate for 8 hours or overnight. Pick out any unmelted ice, drain well, and rinse under cold running water. Toss with the mustard seeds, celery seeds, and red pepper flakes and set aside.
In a non-reactive pot, combine the vinegar, 1 1/2 cups water, the honey, tumeric, mustard powder, and the remaining 1 tablespoon salt. Bring to a full boil.
Working quickly, pack the cucumbers and onions into the jars (not too tightly). Ladle the hot vinegar mixture into the jars, leaving 1/2 inch headspace at the top. Use a chopstick to remove any air bubbles. Take a wet paper towel and clean the rims of the jars before placing lids and bands on the jars.
Place jars in a water bath canner, bring water to a boil, and boil for 15 minutes. Remove jars and do not disturb for 12 hours.
Liquid Laundry Detergent
Who says canning has to be just for food? In the last few years I have noticed that my skin is very sensitive to dyes and perfumes and I have had to switch to hypo-allergenic laundry detergent, soap, and deodorant. Sometimes these specialty items can be a little expensive so I thought I would try making my own laundry detergent.
 |
| The first step is to grate some Fels Naptha. I thought it looked like cheese. |
 |
| Here are all the ingredients for making liquid laundry detergent. I found all these ingredients in the laundry aisle at Fred Meyer Here is the recipe: Liquid Laundry Detergent 3 pints water 1/3 bar Fels Naptha soap, grated 1/2 cup washing baking soda 1/2 cup borax 2 gallon bucket 1 quart hot water Mix soap in saucepan with 3 pints of water. Heat on low until dissolved. Stir in soda and borax until thickened. Remove from heat. Add 1 quart hot water to bucket, then soap mixture. Mix well. Fill rest of bucket with hot water, mix and let sit for 24 hours. Use 1/2 cup per laundry load. |
Thursday, July 14, 2011
Dilled Asparagus
So ever since I purchased the book Canning for a New Generation I have been looking forward to spring and asparagus because I wanted to try a recipe for dilled asparagus. Unfortunately, spring was really busy and by the time July came, I figured my dreams of asparagus in 2011 were over. Imagine my surprise when I was at the Farmers Market at City Hall in Seattle and I saw ASPARAGUS!!! Well I immediately snatched up some and canned them that night.
 |
| Here is just a sampling of the asparagus I purchased. I need to cut it down to size |
 |
| I figured I better show you how I sterilize my jars before filling them. That's right, I let them boil in the water bath canner I am heating up to can the asparagus |
 |
| A quick flash boil to bring out the bright color |
 |
| The finished product |
Pickled Asparagus (makes 2 pints)
1 lb thick asparagus tips cut 4 inches long (about 3 bunches)
2 cups rice vinegar (4% acidity)
1 1/2 tsp kosher salt
1 1/2 tsp sugar
2 tsp pickling spice (I got mine from Penzey's and it smelled so good)
2 cloves garlic, peeled
Get the water bath canner going and sterilize your jars and lids
In a wide saucepan, bring 2 inches water to a boil. then add the asparagus; bring back to a boil, then immediately drain and transfer to a bowl of ice water to cool. Drain well
In a non-reactive pot, combine the vinegar, 1 cup water, the salt, and sugar. Bring to a boil.
Divide the asparagus, pickling spice, and garlic cloves between the hot jars. Ladle the hot vinegar mixture into the jars, leaving 1/2 inch headspace. Put on lids and rings tightening to finger tight. Put the jars in the water bath canner making sure the jars are covered by at least one inch of water and boil for 10 minutes. Remove the jars from the canner and let cool.
Now, my friend sent me a recipe for spicy pickled asparagus. I think I might use it to pickle green beans later in the season.
Sriracha Pickles Asparagus (makes 4 pints)
3 cups white wine vinegar
3 cups water
1/4 cup pickling salt
2 lbs asparagus trimmed to fit jars
1 cup Sriracha
12 cloves garlic
16 peppercorns
4 tsp dill seed
In a medium saucepan over medium-high heat, bring the vinegar, water, and salt to boil for 5 minutes.
In hot jars, pack equal amounts of asparagus, sriracha, garlic, pepper corns, and dill seed in the jars. Top each with the hot vinegar mixture, leaving 1/2 inch headspace in each jar. Process in a water bath canner for 8 minutes. Let sit in a cool, dark place for 4-6 weeks before opening.
Sunday, July 10, 2011
Black Beans!! My First Experience with a Pressure Canner
So I recently had a birthday and imagine my excitement when I opened a pressure canner!!! I have several bags of dried black beans and I never seem to have 8 hours to cook them so I decided to can some black beans first.
Long story short, it was a very long process. Here is what I did.
I took a bunch of black beans and soaked them in water overnight
Second, I rinsed the black beans and brought them to a boil in clean water and boiled the beans for 30 minutes. Meanwhile, I got another pot of fresh water and brought that to a boil, sanitized my jars, and filled my pressure canner up to the first line (there are marks inside the canner) and heated that water up.
After the beans had boiled in water for 30 minutes, I put a 1/4 tsp of salt (optional) in the bottom of each jar and I filled the jars with drained black beans leaving 1 inch of headspace at the top. After filling the jars, I pounded them a couple times on the counter to settle the beans and get more beans into each jar.
After filling the jars with black beans, I took my clean boiling water and put that in each jars up until the top of the beans (the 1 inch of headspace is really important). Then I put my prepared lids on top and screwed on the rings to secure the rings.
Now for the fun part. I put the jars into the canner, put the lid on and locked it. According to manufacturers instructions, I brought the canner up to pressure which for beans at sea level is 11 psi. This part took quite a while. I have a pretty big canner. Then I sat in the kitchen reading and watching the dial on my canner for 75 minutes to make sure it stayed at or above 11 psi because if the pressure lowers below 11 psi, then I would need to start the whole process over again.
Remember I did this twice because there are a lot of beans in one mylar bag of beans. After all that work, I did end up with 17 cans of beans (one didn't seal and I needed to throw it out). I haven't tried them yet, but I plan to use them this summer as they are an easy no cook protein I can use for dinners.
 |
| Little did I know one mylar bag of beans is a lot of beans (this isn't all of them) |
 |
| First I soaked the beans overnight, then I rinsed them and boiled them for 30 minutes |
 |
| Like I said, a lot of beans. In the pressure canner is my first batch processing. The second batch is boiling away. |
I took a bunch of black beans and soaked them in water overnight
Second, I rinsed the black beans and brought them to a boil in clean water and boiled the beans for 30 minutes. Meanwhile, I got another pot of fresh water and brought that to a boil, sanitized my jars, and filled my pressure canner up to the first line (there are marks inside the canner) and heated that water up.
After the beans had boiled in water for 30 minutes, I put a 1/4 tsp of salt (optional) in the bottom of each jar and I filled the jars with drained black beans leaving 1 inch of headspace at the top. After filling the jars, I pounded them a couple times on the counter to settle the beans and get more beans into each jar.
After filling the jars with black beans, I took my clean boiling water and put that in each jars up until the top of the beans (the 1 inch of headspace is really important). Then I put my prepared lids on top and screwed on the rings to secure the rings.
Now for the fun part. I put the jars into the canner, put the lid on and locked it. According to manufacturers instructions, I brought the canner up to pressure which for beans at sea level is 11 psi. This part took quite a while. I have a pretty big canner. Then I sat in the kitchen reading and watching the dial on my canner for 75 minutes to make sure it stayed at or above 11 psi because if the pressure lowers below 11 psi, then I would need to start the whole process over again.
Remember I did this twice because there are a lot of beans in one mylar bag of beans. After all that work, I did end up with 17 cans of beans (one didn't seal and I needed to throw it out). I haven't tried them yet, but I plan to use them this summer as they are an easy no cook protein I can use for dinners.
Tuesday, April 12, 2011
Zaycon Foods
So I recently found a company that offers great deals on food in bulk. They are able to offer great deals because they work directly with farmers so the food is as fresh as you can get it without having your own farm. The trick is you have to buy in huge quantities (get a few friends together and split the loot) and you buy what they are selling when it is available. Right now, apples are what's being offered, but their website says it will offer the Seattle area extra lean ground beef soon.

Check it out if you are interested in local produce and meat direct from the farmers.
https://www.zayconfoods.com/

Check it out if you are interested in local produce and meat direct from the farmers.
https://www.zayconfoods.com/
Monday, April 4, 2011
Where do I get my Fruit??


After my last few posts, I'm sure you are wondering where do I get my fruit? How am I canning in what should be spring but still feels like winter? Well I have a few ways of getting my produce. Obviously, I watch for sales at the grocery store and I attend farmers' markets. I look on the internet for U-Pick farms in the area to see what is in season and what I can harvest myself (check prices before you go, sometimes it's not worth the drive for the price you get).
However, my favorite place to get produce is from people. I talk to my friends, my co-workers, my neighbors. I tell them about my obsession for canning and, soon, people start to tell me about their cherry trees or how they have so many tomatoes, they can't eat them all. I've got a friend who brings oranges back from her tree in Arizona. Maybe people don't have fruit or vegetables in their own garden, but they have parents or uncles or aunts who live on a farm and would love to give me produce for a small fee. I love getting produce like this because then I know exactly where it came from and I get to meet people and share something important to me with them.
Monday, March 28, 2011
Plum Cardamom Jam
I had some plums in my freezer so I thought I would try a new recipe from my new canning book I picked up.  The book is CANNING for a New Generation by Liana Krisoff. I like this book because it has beautiful pictures, interesting flavor combinations, and recipes for using your canned foods.
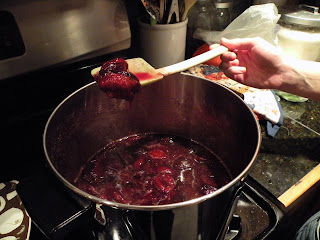 Here we are in the early stages cooking the plums in sugar
 This recipe does not call for pectin so it takes a lot of stirring and cooking to get it thick
 Here is a picture of my jars sterilizing in the water bath canner and my lids sterilizing in a pot of hot water
 Here we are filling the jars. The color is beautiful. I cannot say enough about how important a wide-mouth funnel is for making jam.
 The book is CANNING for a New Generation by Liana Krisoff. I like this book because it has beautiful pictures, interesting flavor combinations, and recipes for using your canned foods.
  Here we are in the early stages cooking the plums in sugar
 This recipe does not call for pectin so it takes a lot of stirring and cooking to get it thick
 Here is a picture of my jars sterilizing in the water bath canner and my lids sterilizing in a pot of hot water
 Here we are filling the jars. The color is beautiful. I cannot say enough about how important a wide-mouth funnel is for making jam.
And now, for the recipe:
Plum Cardamom Jam
4 lbs ripe black plums, pitted and diced
2 cups sugar
3 T strained fresh lemon juice
1 T freshly ground cardamom seeds (or a little more if using pre-ground)
Prepare your water bath canner and sterilize jars and lids
Put the plums and sugar in a wide, 6-8 quart pot. Bring to a simmer, stirring frequently, then continue to cook for 5 minutes. Pour into a colander set over a large bowl and stir the plums gently to drain off the juice. Return the juice to the pan and bring to a boil over high heat. Boil, stirring occasionally, until the syrup is reduced and thick, about 10 minutes.
Return the plums and any accumulated juice to the pan, along with the lime juice and cardamom, and bring to a simmer. Simmer, stirring frequently, until a small dab of the jam spooned onto the cold plate and set in the freezer for a minute becomes some-what firm (it will not gel), about 15 minutes. Remove from the heat.
Ladle the hot jam into the jars, leaving 1/4" headspace at the top. Use a damp paper towel to wipe the rims of the jars, then put a flat lid and ring on each jar, adjusting the ring so that it's just finger tight. Return the jars to the water bath canner making sure there is an inch of water over the jars. Process in boiling water for 5 minutes.
Jamboree!!
Here's a great party idea. Have a jamboree! I know it sounds like something boy scouts do, but it can also be a group of friends getting together to make jam. A week ago, three of my friends, who knew how to make jam, got together to teach people who have never made jam before how to make it. I planned to take lots of pictures, but when I pulled out my camera, the battery was dead. Too bad because it was a lot of fun and a wide variety of jams. We made three types. We made a traditional fruit jam with pectin (blueberry lime), a savory jam (onion balsamic jam), and a jam without pectin (pear ginger jam). I hope these recipes will inspire you to have your own jamboree. Call me if you would like some help teaching a class.
Below are the recipes:
Blueberry Lime Jam
4 1/2 C blueberries
1 T grated lime peel
1 pkg powdered pectin
1/3 C lime juice
5 C sugar Crush berries one layer at a time.
Combine crushed blueberries and pectin in a large saucepot. Bring to a boil stirring frequently. Add sugar, stirring until dissolved. Stir in grated lime peel and lime juice. Bring to a rolling boil. Boil hard for one minute, stirring constantly.
Remove from heat. Skim foam if necessary. Ladle hot jam into sterilized hot 1/2 pint jars, leaving 1/4" headspace. Clean jar rims and put lids and bands on. Process in a water bath canner for 15 minutes.
Balsamic Onion Jam
Dan Craven
4 lbs onions (sliced thin)
6 shallots (sliced thinly)
3 slices bacon or pancetta
6 sprigs fresh thymediv
2 cups sugar
1 cup dark brown sugar
2 cups red wine
1 cup balsamic vinegar
2 tsp kosher salt
2 T extra virgin olive oil
2 pkgs liquid pectin
Place a large non-reactive pan over medium-low heat. Add the bacon and render the fat. Once the bacon has crisped, remove.
Turn up the heat to high, add the onions, salt, thyme and olive oil. Stir to make sure the onions are coated with the oil and bacon fat.
Cook on high, covered with a tight lid, for about 20 minutes. Remove thyme stems. Continue to cook stirring every 5 to 10 minutes until the onions begin to turn golden brown. Add the sugar, brown sugar, red wine, and balsamic vinegar. Cook over medium heat until viscous.
To test if it's the right consistency, dribble a bit of the reduction on a plate and it is still liquid, but slowly slips down the plate after it cools briefly.
I also look for doneness by dragging a spoon against the bottom of the pot. If it leaves a long valley, then it is done.
WARNING: Do not walk away from this once it begins to get close. There is enough sugar in this that it can burn and create sugar concrete on the bottom of your pan.
Remove from heat and stir in liquid pectin. Return to heat and boil for one minute. Ladle into prepared glass jars and water bath process for 20 minutes.
Pear Ginger Jam
1 3" stick cinnamon.
1 tsp whole cloves.
6 cups pears (cored, peeled, chopped)
1/4 cup lemon juice
4 1/2 cups sugar
1/4 cups candied ginger, chopped.
Place the cinnamon and cloves in a cheesecloth bag. Bring the pears and lemon juice to a boil over medium heat. Cover and simmer for 10 minutes, stirring often. Add the sugar, ginger and cheesecloth bag of cinnamon and cloves. Stir until the sugar has dissolved.
Cook for 20-25 minutes on medium heat, stirring often. Pour into sterilized jars, seal and process for 10 minutes.
Sunday, February 6, 2011
Blueberry Peach Jam
Before I get into making jam, I just want to put a plug in for my favorite canning book of all time. It is called Blue Ribbon Preserves by Linda J. Amendt. At the beginning of the book she explains all about making jam. Several things that surprised me when I first looked at it. First off, you NEVER double a jam recipe. The reason is all about surface area. If you double a recipe, it will not be able to reduce enough and then your jam will never set up. Second, the way my mom sealed a jar by turning it upside down is no longer considered safe. All jams need to go through a water bath canning process to kill all traces of botulism (if any).
The book lists all the equipment you need and explains why it is important. Also, what I think is the best part of the book, you know all the recipes are good because they are all competition winners.
Okay, now for the fun part. This recipe started from a recipe from Blue Ribbon Preserves and then morphed as I discovered what ingredients I had (this is not always a good idea. My uncle was trying to make my grandpa's famous carrot cake once and he realized he didn't have flour so he exchanged it for sugar, he realized he didn't have cinnamon so he just used red pepper. Long story short, it didn't turn out).
 Blackberry Peach Jam (adapted from Peach Melba Jam)
makes 7 half pint jars
3 cups peeled, pitted and crushed ripe peaches
3 Tablespoons strained fresh lemon juice
7 1/4 cups sugar
1 cup crushed and seeded blackberry pulp
1/2 tsp unsalted butter
1 (3-ounce) pouch liquid pectin
In an 8-quart pan, combine the peaches and lemon juice. Stir in about half of the sugar. Cover the pan and let stand for 20 minutes.
Remove the cover. Stir in the blackberry pulp, remaining sugar and the butter. Over medium-low heat, stirring constantly, heat the mixture until the sugar is completely dissolved. Increase the heat to medium-high and bring the mixture to a full rolling boil, stirring constantly. Remove the pan from the heat and skim off the foam.
Return the pan to the heat and bring the mixture to a full rolling boil. Stir in the entire contents of the pectin pouch. Return the mixture to a full rolling boil, stirring constantly. Boil stirring constantly for 1 minute. Remove the pan from the heat. Skim off any foam.
To prevent the jam from separating in the jars, allow the jam to cool 5 minutes before filling the jars. Gently stir the jam every minute or so to distribute the fruit. Ladle the hot jam into hot jars, leaving 1/4 inch headspace. Wipe the jar rims and threads with a clean, damp cloth. Cover with hot lids and apply screw rings. Process half-pint jars in a 200F water bath for 10 minutes, pint jars for 15 minutes.
I mentioned that I made changes. I only had 2 1/2 cups of crushed peaches, since I didn't have enough, I modified the amount of blackberries to make up for it so I used 1 1/2 cups blackberries. Also, I am lazy so I did not seed the blackberries. I like to think of my jam as rustic.
Thursday, February 3, 2011
Changes at the Cannery
Recently I received an e-mail from the Stake Canning Specialist (a Stake is a group of 6-15 Mormon congregations). She informed me that the Seattle cannery as Mormons know it is no longer in existence (for those of you who are unfamiliar with the term "cannery" it was a place people could go purchase and can dry goods in #10 cans or mylar pouches to store in their home for food storage. Typical items that could be canned included red wheat, flour, sugar, pasta, rice, dry milk, oatmeal...you get the point).
Due to government regulations, food canning must be done in a closed room with an air ventilation system. Unfortunately, it is not cost effective to update the cannery in Seattle, Washington so things are changing.
You will still be able to purchase all your favorite canning foods from the cannery (you can a find a list of what is available at http://www.providentliving.org/ just click on the link for Family Home Storage, followed by Home Storage order form.
Times the Seattle Cannery are open include:
Tuesdays from 10:00am - 1:00pm
Wednesdays from 5:00pm - 7:00pm
Saturday from 10:00am - 1:00pm
The cannery will sell all bulk products, pre-packed foods, and canning items listed on the church order from (form found at http://www.providentliving.org/) Prepackaged items are sold by the individual can.
The cannery has updated their payment methods. They now accept Visa, Mastercard, Discover, American Express, check, and exact change.
The can sealers and pouch sealers are now available to church members for in-home individual and family canning on a first come, first serve basis. If you are intersted in this option, call (425) 315-1514 to reserve a sealer.
Subscribe to:
Comments (Atom)